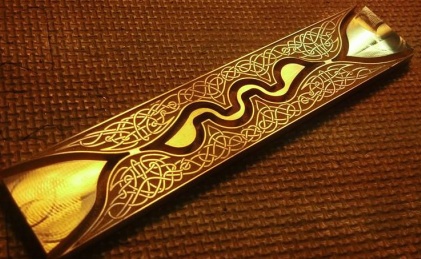
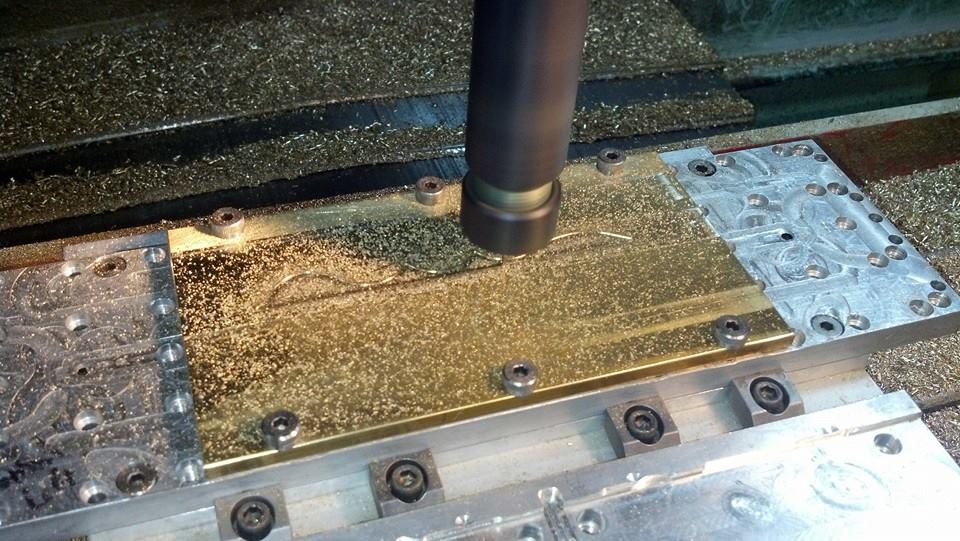
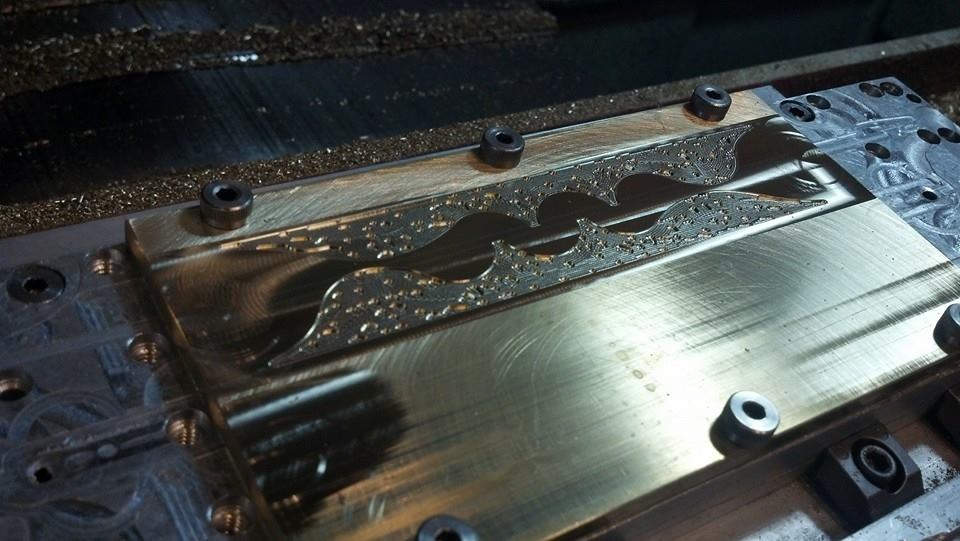
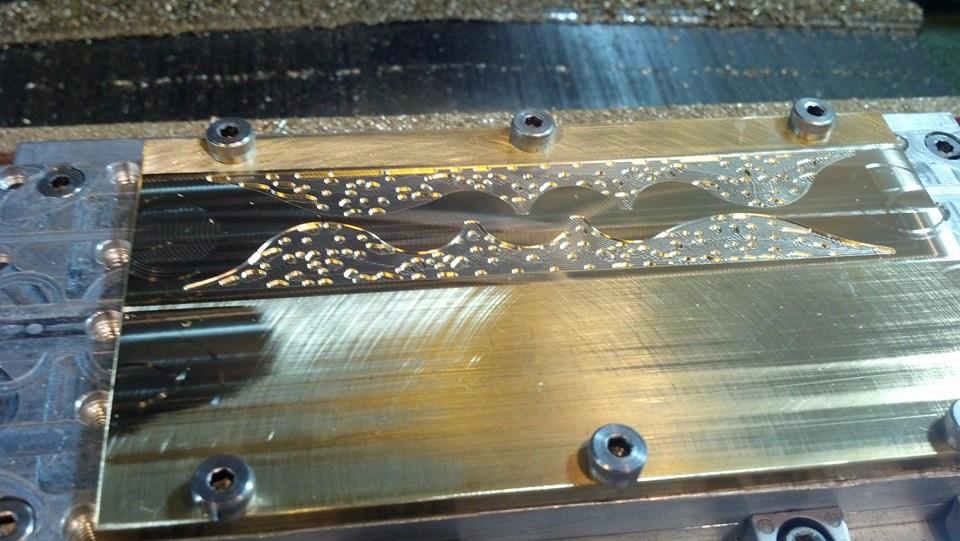
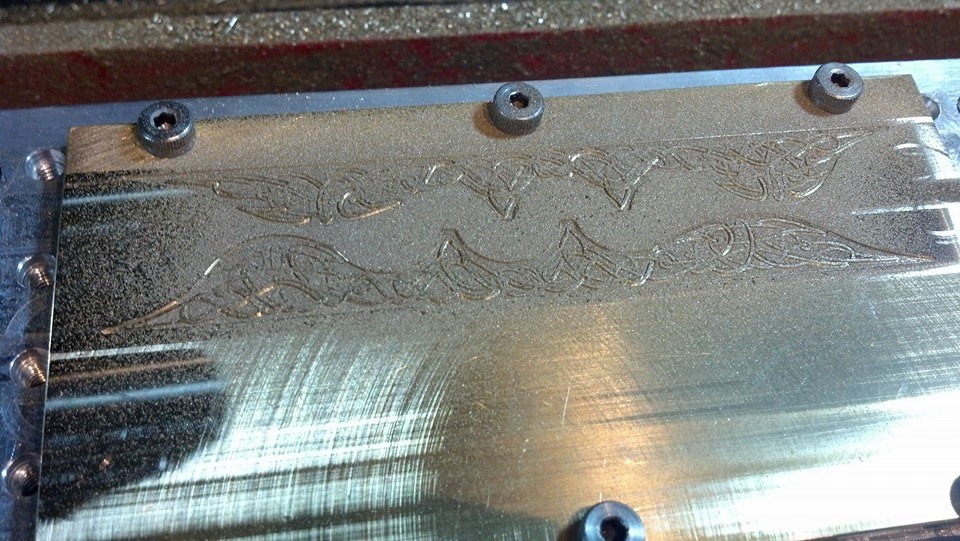
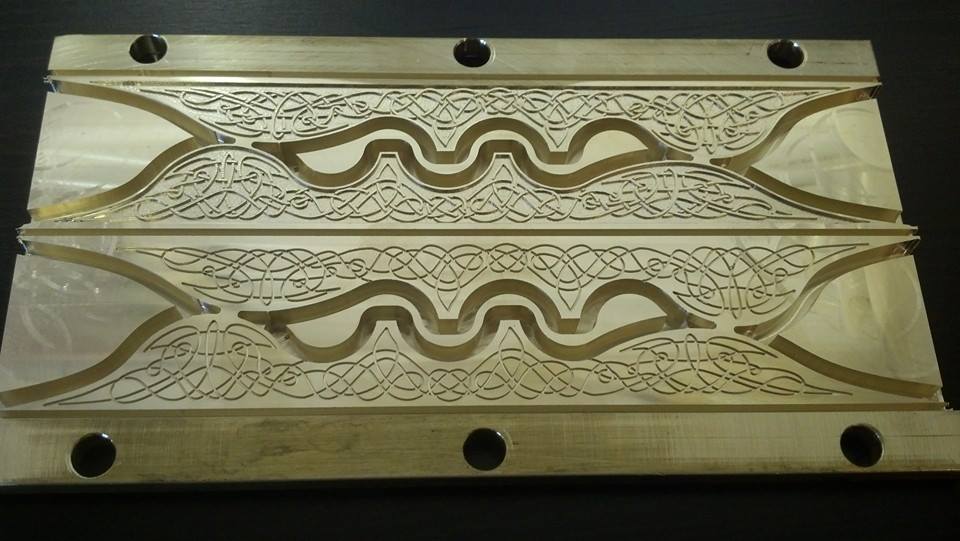
 I enjoy the art of trumpet playing as well as the art of trumpet building. So in the spirit of creating art, I introduce special limited edition trumpets every year. This could be the golden year for new offerings! The Summit One model has been incredibly popular and for good reason. It plays extremely well and it really catches your eye. I have other numbered special edition Summit models coming including the Zero, which is a binary tech trumpet. And the Summit Two, which is almost organic with smooth hole transitions throughout. And today I am unveiling the Summit Vines, which I created after studying a large body of Celtic artwork. The photo above shows the very first Celtic Vines bracing, which I made earlier today. After machining, I carefully sanded the braces and filled the background with brass dust (of which I have plenty!) to temporarily give the design depth. The finished design will be back-filled with your choice of black wax or one of a variety of permanent acrylic colors. Matching components will include finger rings, finger buttons, top caps, tuning slide and possibly the receiver and 5MM mouthpiece. 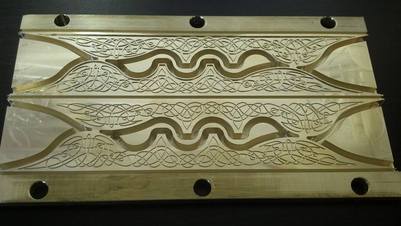 The Vines will be offered in at least three variations including;
I have designs for a simpler version of the Vines theme with real hardwood inlays in Cherry, Walnut, Maple and Ash. We'll see how much time I set aside for these "art" projects as this type of work requires considerably more time and mental focus. Special thanks to Rick Swann for encouraging me to pursue this huge project. Rick has been very patient waiting a considerable length of time for his new Harrelson trumpet. His vision happened to coincide with my Vines design which was originally sketched in 2004. I would also like to thank all of my Summit Art and Bravura Flugelhorn clients who have exhibited a great deal of patience over the past two years. You will soon see your custom art come to life here on the HT website and my blog! The gallery of photos above shows the CNC machining of Summit Vines Celtic top bracing. I spent around 20 hours drawing this design that fits perfectly into a new brace shape designed specifically for Vines. There are 316 individual "vine" segments and leaves in each brace and nearly one million lines of cnc programming code required to cut the pair of braces.
1 Comment
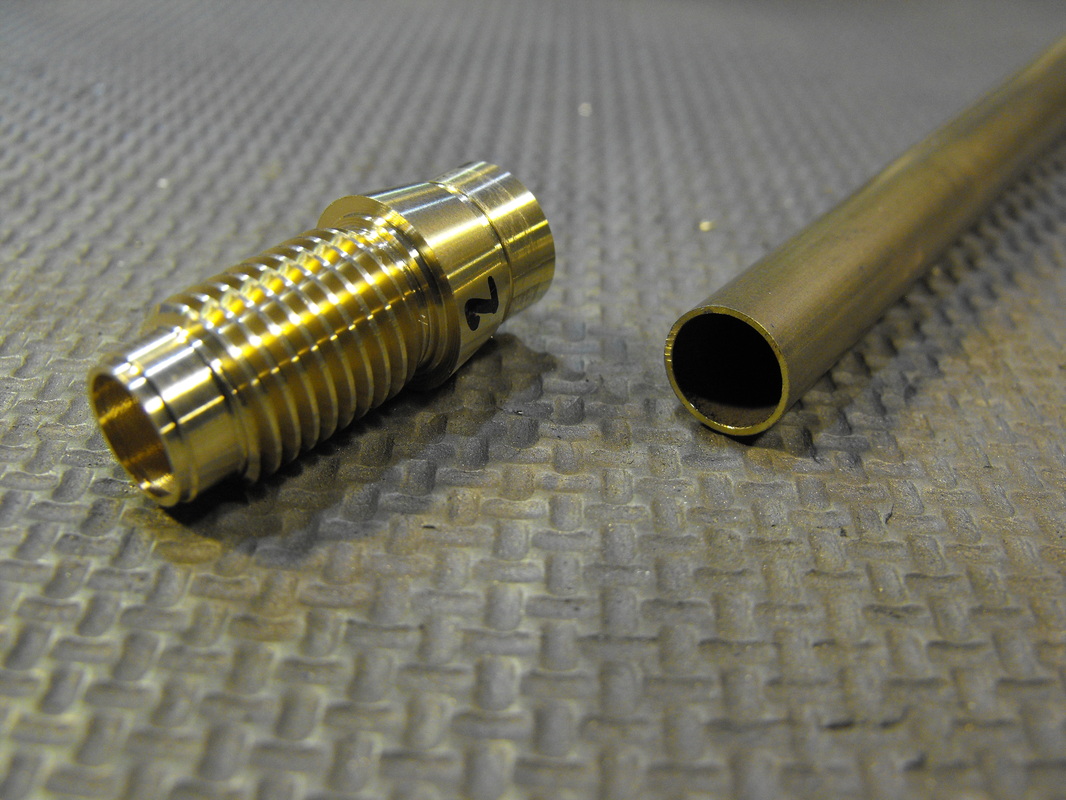
 Installing the Adjustable Gap Receiver yourself is a possibility if you have a few hours and some basic tools. Most installations require 3 to 4 hours by a novice and around 2 hours for experienced technicians with access to a repair shop. Of course, these times will vary based on your experience soldering, sanding and finishing, but I usually install an AGR in an hour and the rest is clean up time. My demonstration trumpet is a Bach C 229 that received a Malone conversion years ago. A local Denver player brought this horn in for the AGR Retrofit to increase efficiency and improve the upper register. The AGR gives you full control over air flow, flexibility, slotting and impedance allowing you to fine tune your horn and mouthpiece configuration far beyond what is possible with any other method. After the AGR installation, I personally found this Bach to play incredibly easier in all registers, but especially in the zone from G above the to high E. Wide interval leaps are now much easier and attacks are much more clean and centered. I welcome your feedback as you install your own AGR and fine tune your setup. Please leave a comment if you have any questions with the following instructions and I'll be happy to edit this tutorial. Thanks again for trusting me with your brass playing innovations and have fun with this project!
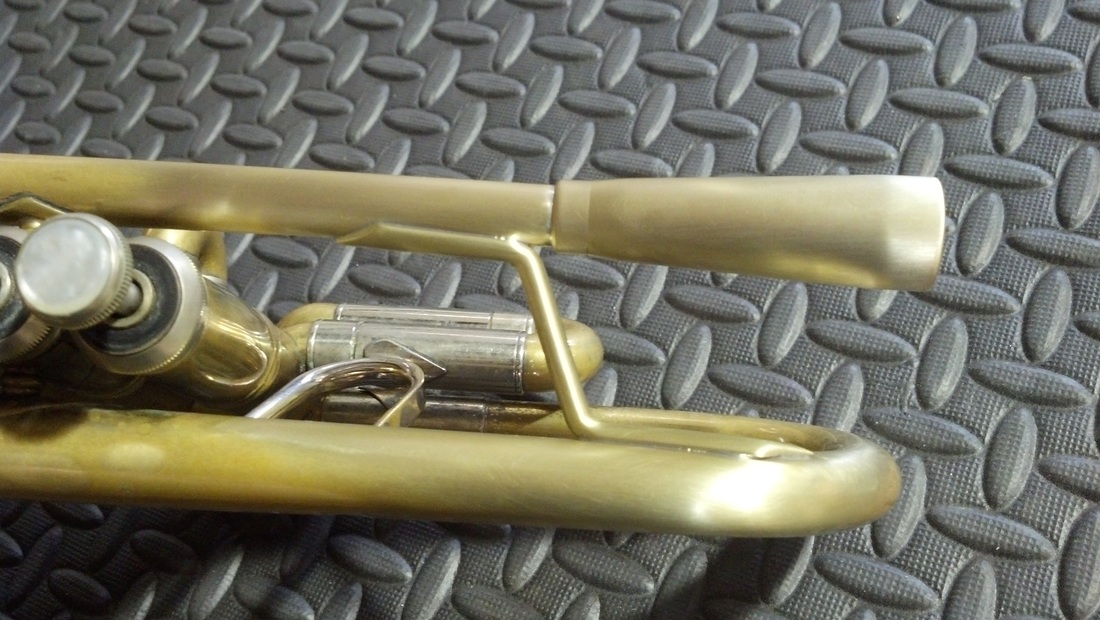
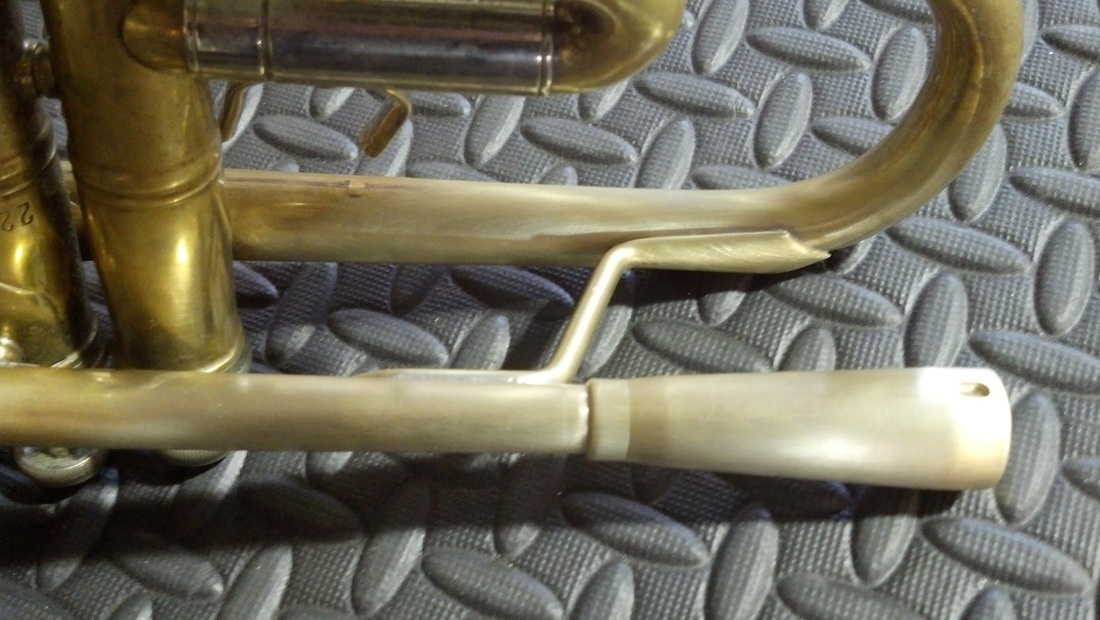
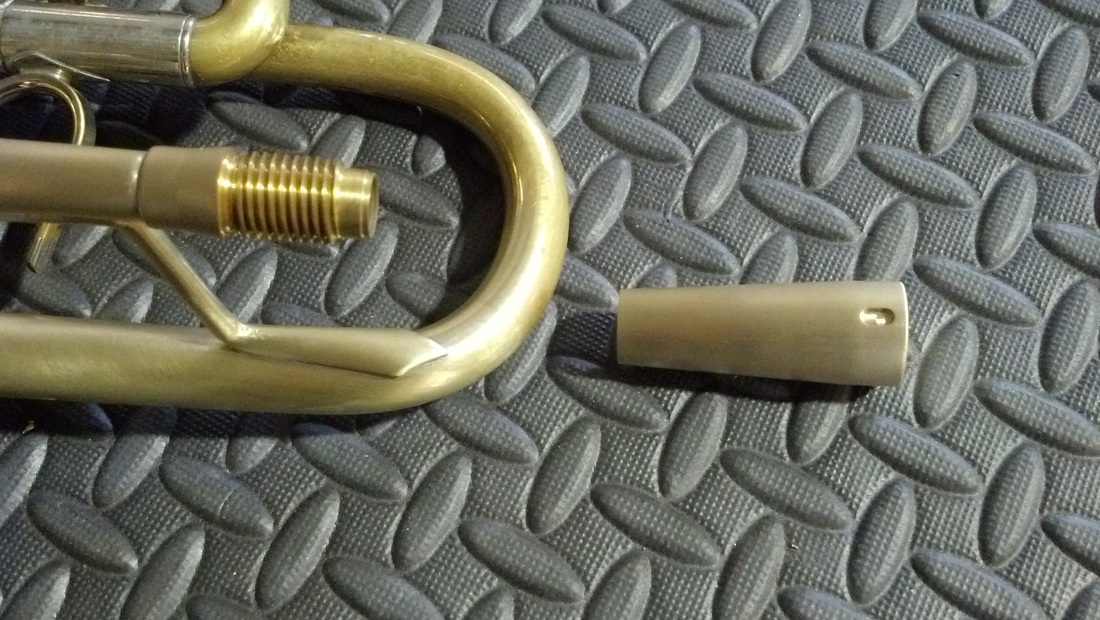
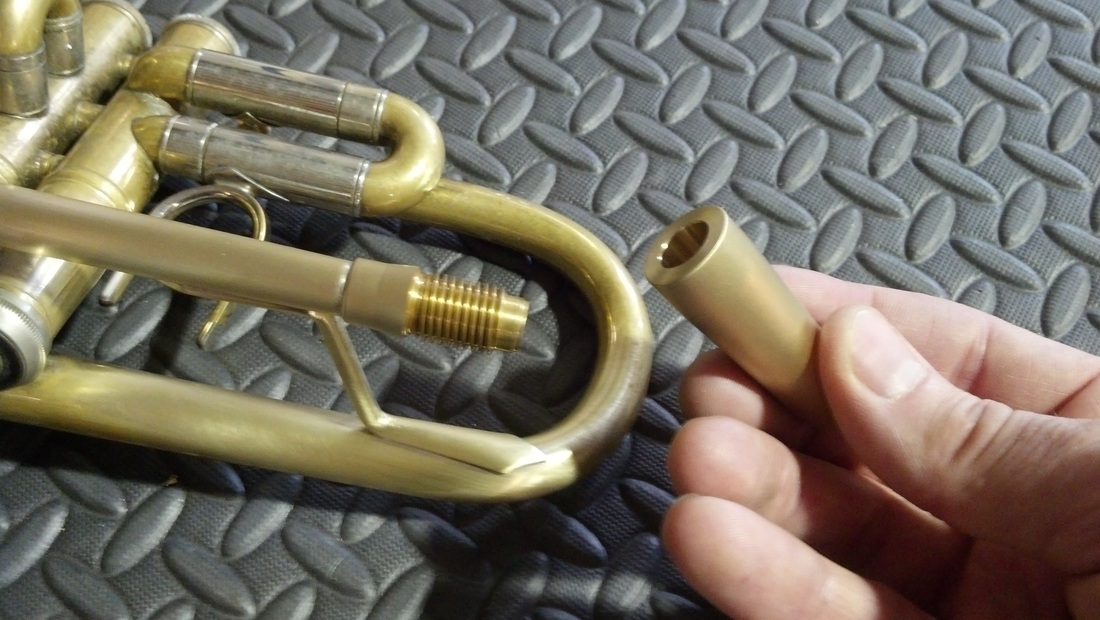
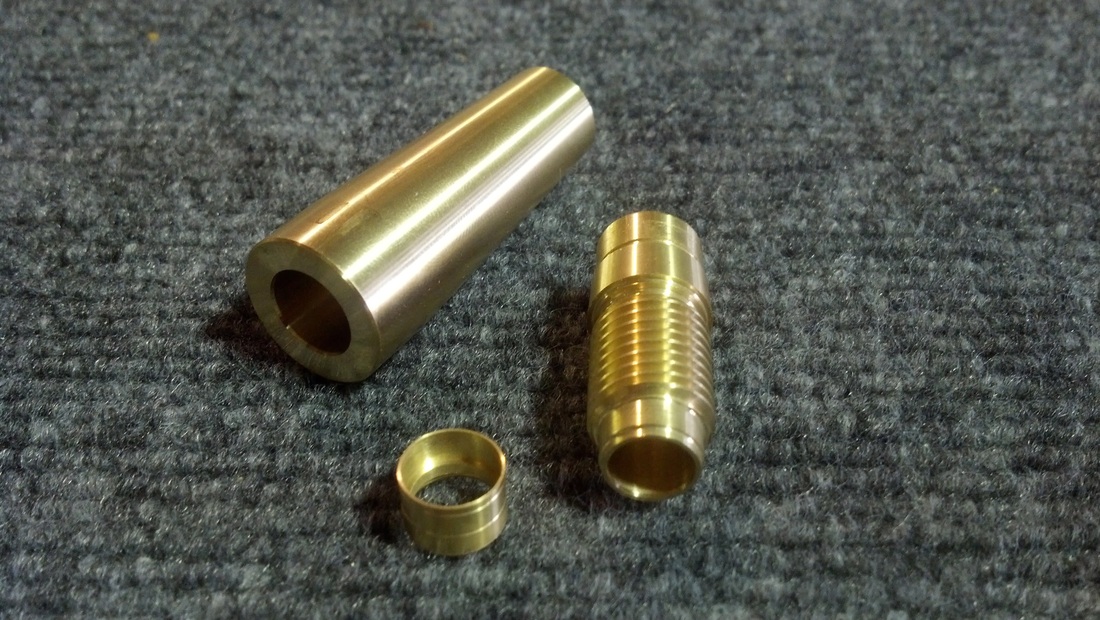
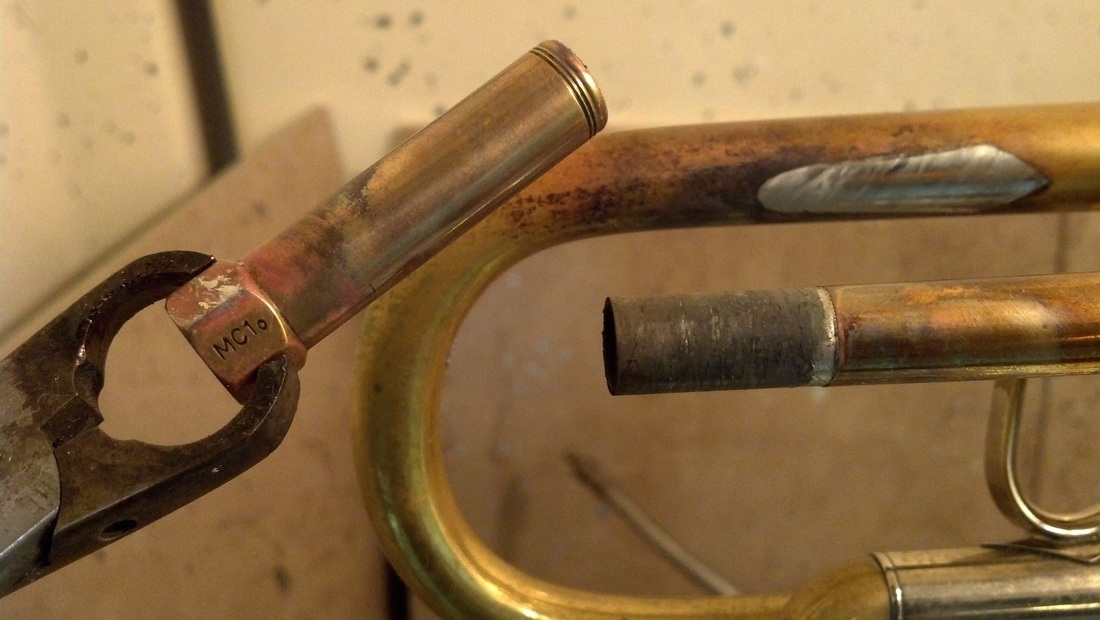 2) Carefully heat from under the receiver and brace with a medium flame and remove with a twisting motion. This receiver had almost no solder holding it together!  3) Sand the outside diameter of the leadpipe end to fit the AGR Mount. Insert a Sharpie pen into the leadpipe to keep the shop roll sand paper from slipping off of the end while sanding. 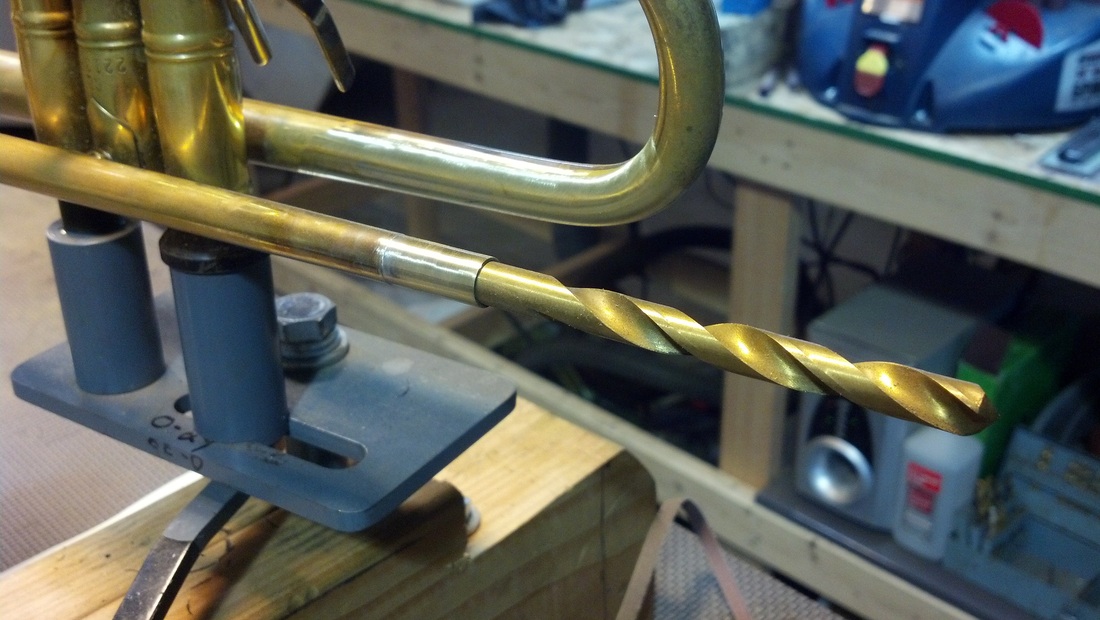 4) Or you could use a drill bit sized close to the venturi. 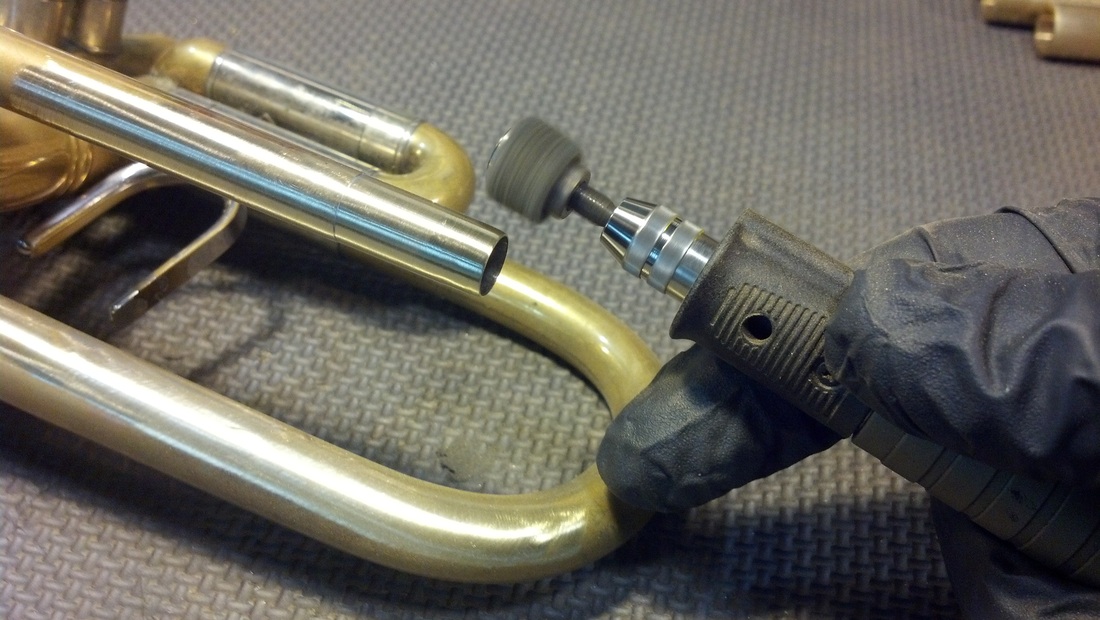 5) In cases where a lot of material must be removed, as with this Malone leadpipe that is very thick, a rotary tool with a 3M soft abrasive wheel will speed up the process. 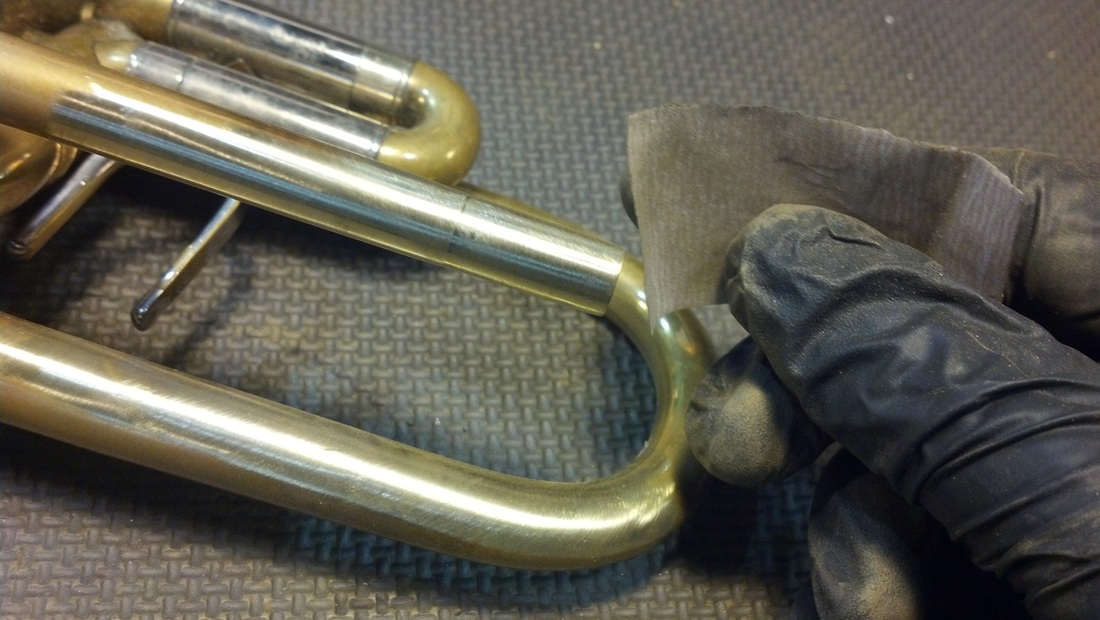 6) After using a rotary tool for roughing, it is important to finish sanding by hand with 400 grit paper. Do not use grit with a lower number. 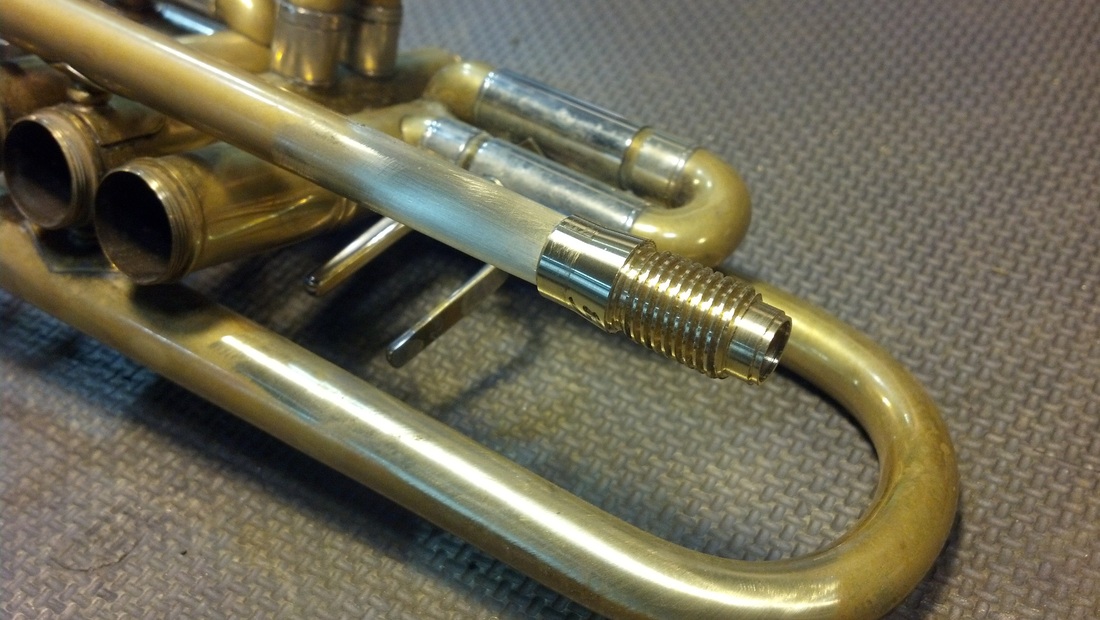 7) Fit the Mount to the receiver every so often to check your progress. The leadpipe should eventually touch the inside edge of the Mount as you remove material. 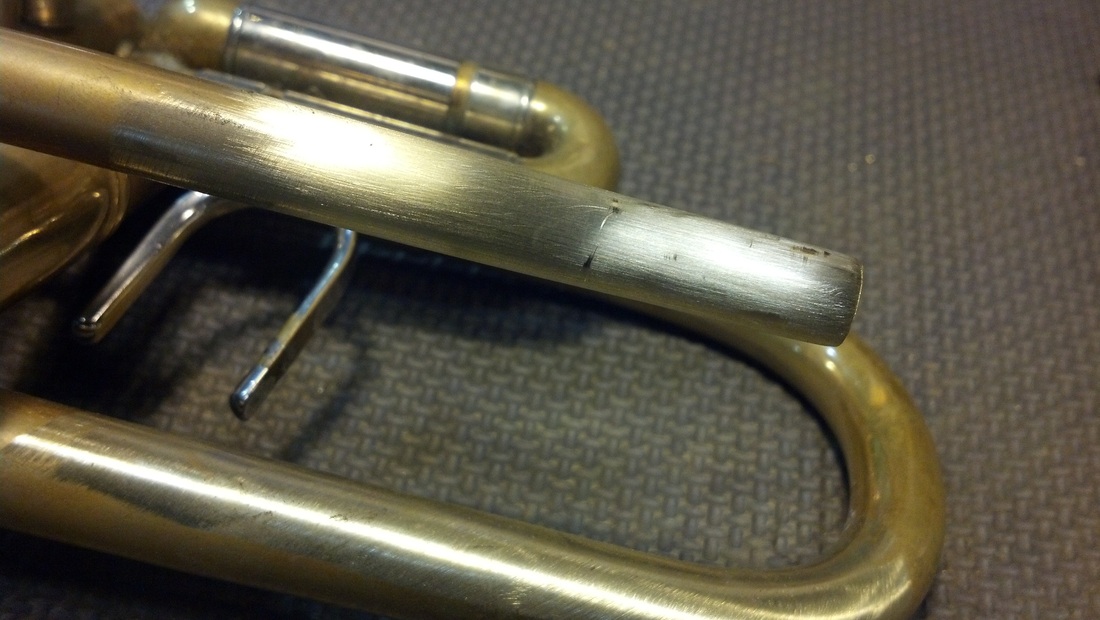 8) Burnishing marks left on leadpipe after test fitting the Mount show you where to finish sanding. 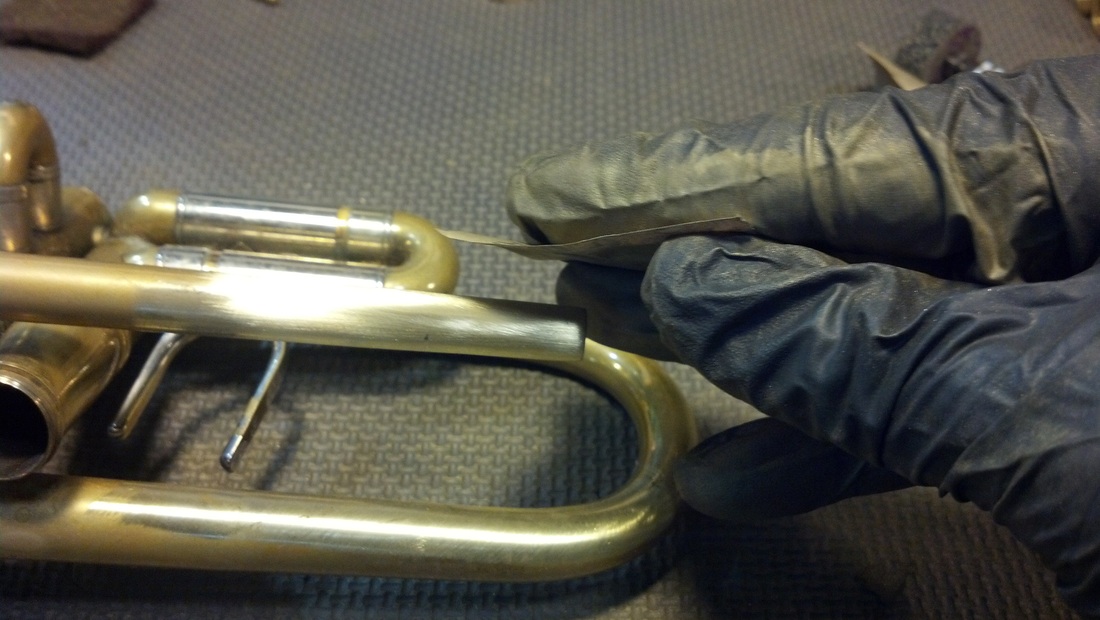 9) Take your time doing this step correctly moving quickly and relatively lightly. My Dad always says, "let the sandpaper do the work!" so there's no need to press hard. Repetitions are key to sanding quickly. 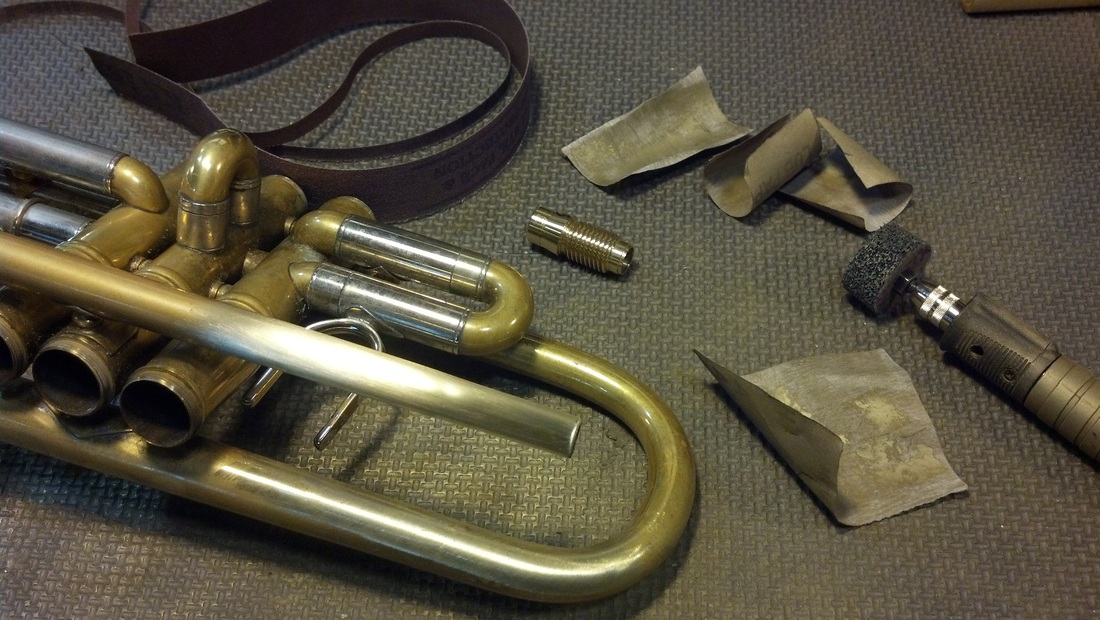 10) Leadpipe prepared for Mount installation. 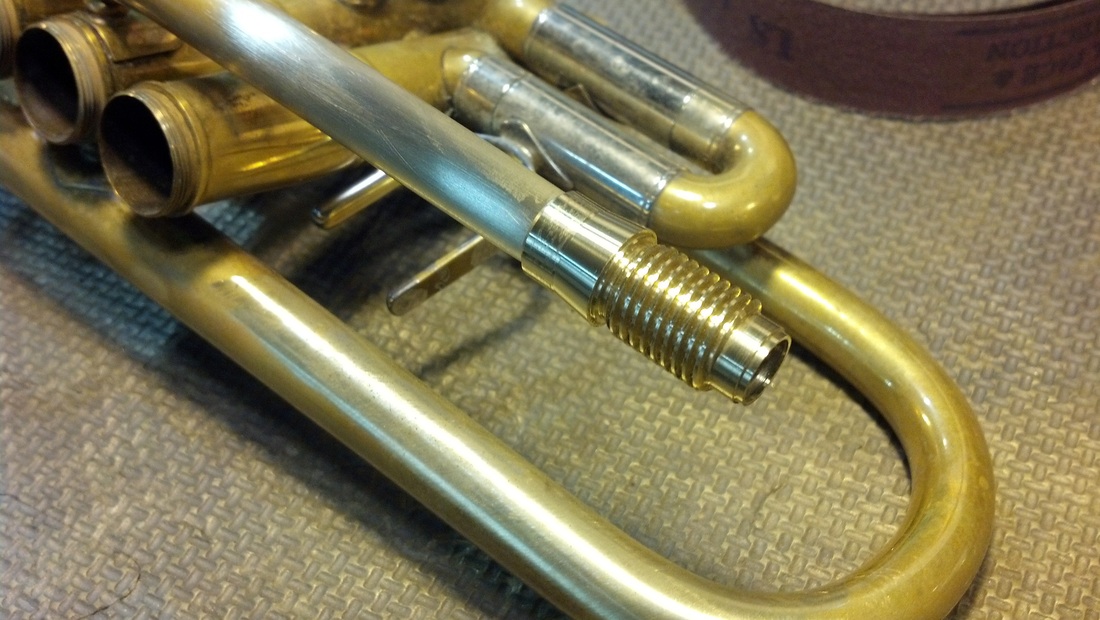 11) The Mount fits almost perfect. The next steps include fluxing all parts and screwing the receiver over the mount and lightly tap into final position.  12) Flux the leadpipe and receiver in preparation for final fit and soldering.  13) I couldn't show the previous step as I only have two hands! I screwed the Receiver onto the Mount and carefully tapped the Mount into place with a rawhide mallet. I recommend doing this with a small piece of wood between the mallet and the Receiver so you don't damage the Receiver, brass deforms easily! Now the Mount and leadpipe meet inside, ready for next step. 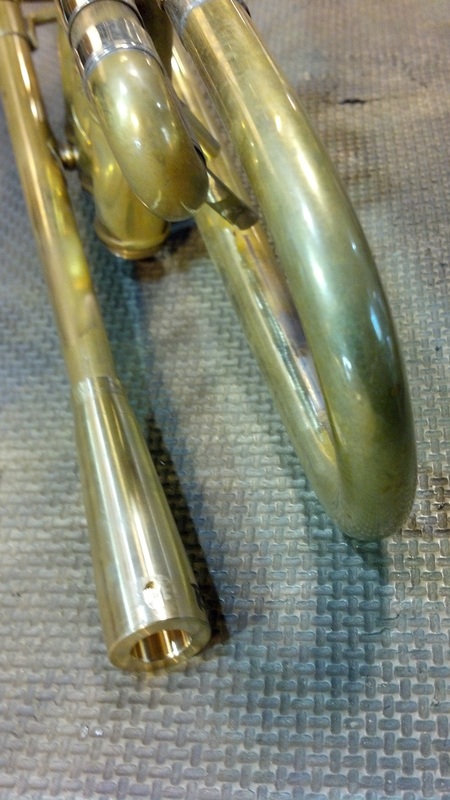 14) After ensuring that the Mount meets the end of the leadpipe (you should have unscrewed it to check), position the small slot on the bottom side of the horn so it is not visible when playing. 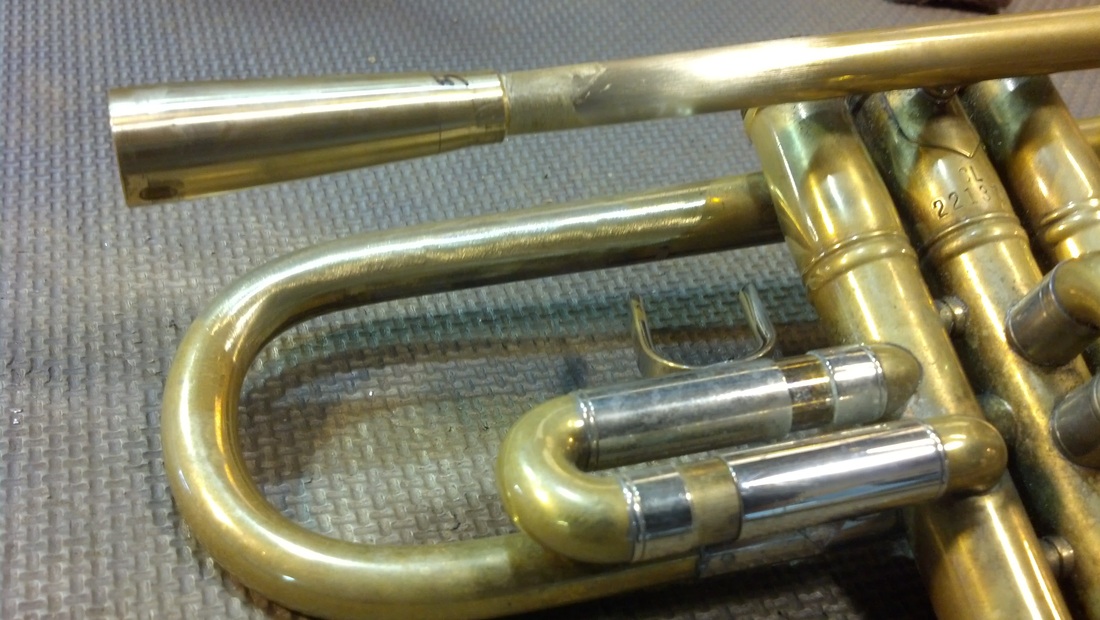 15) Looks good, the Receiver is positioned properly. 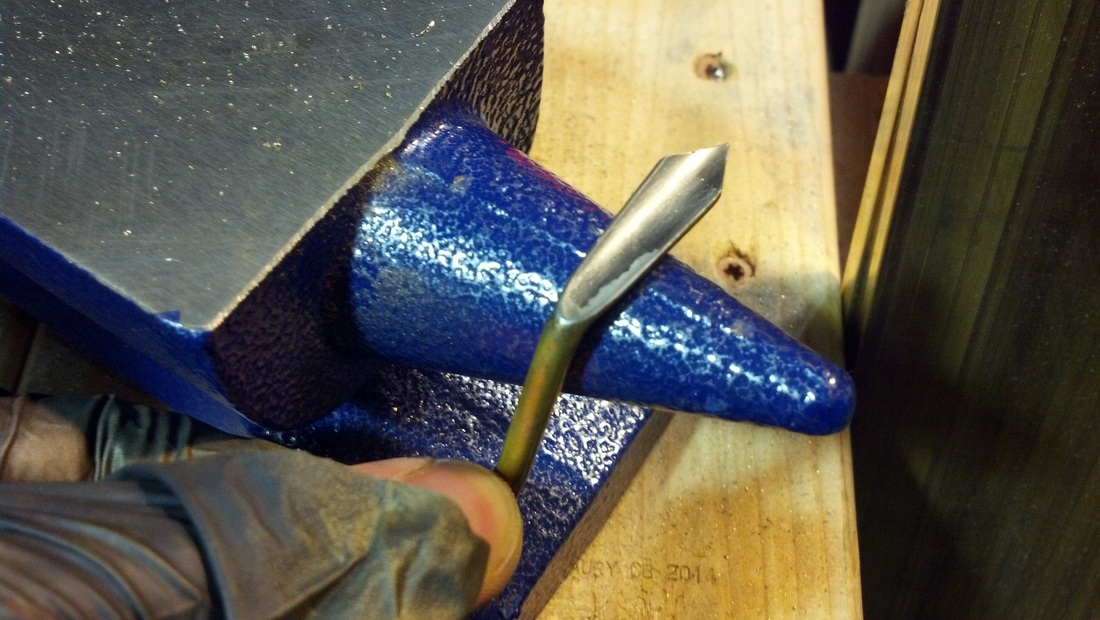 16) I recommend installing the original "S" brace backwards. I work on the anvil carefully tapping the brace to re-shape it to fit in the new position. 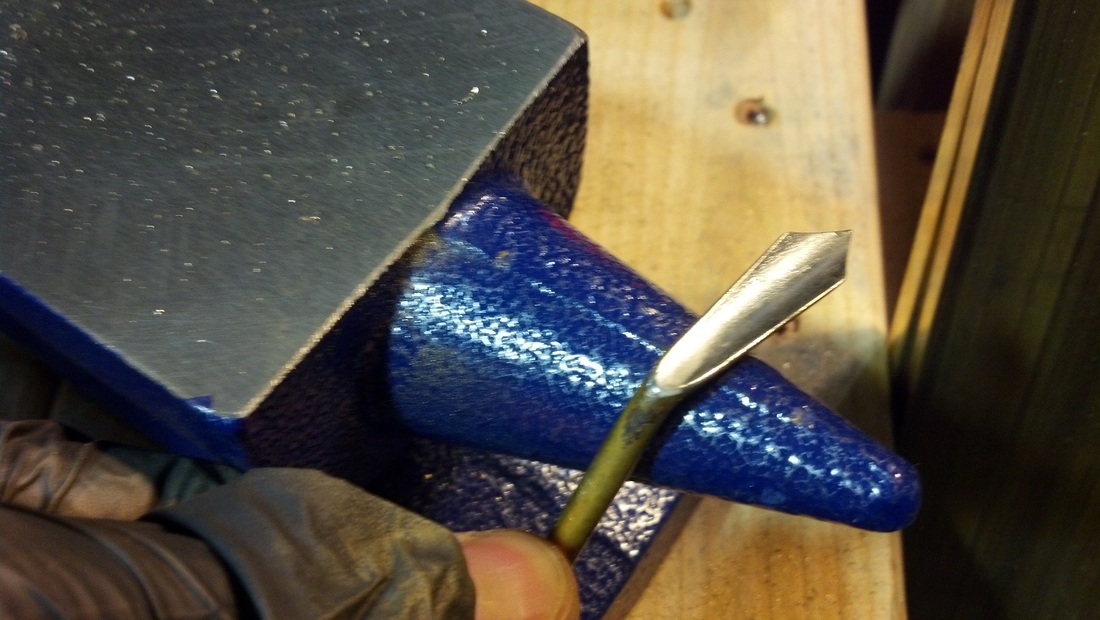 17) It will be necessary to change the angles of both sides. I go so far as to shape the end of the brace to nicely wrap around part of the bell crook. 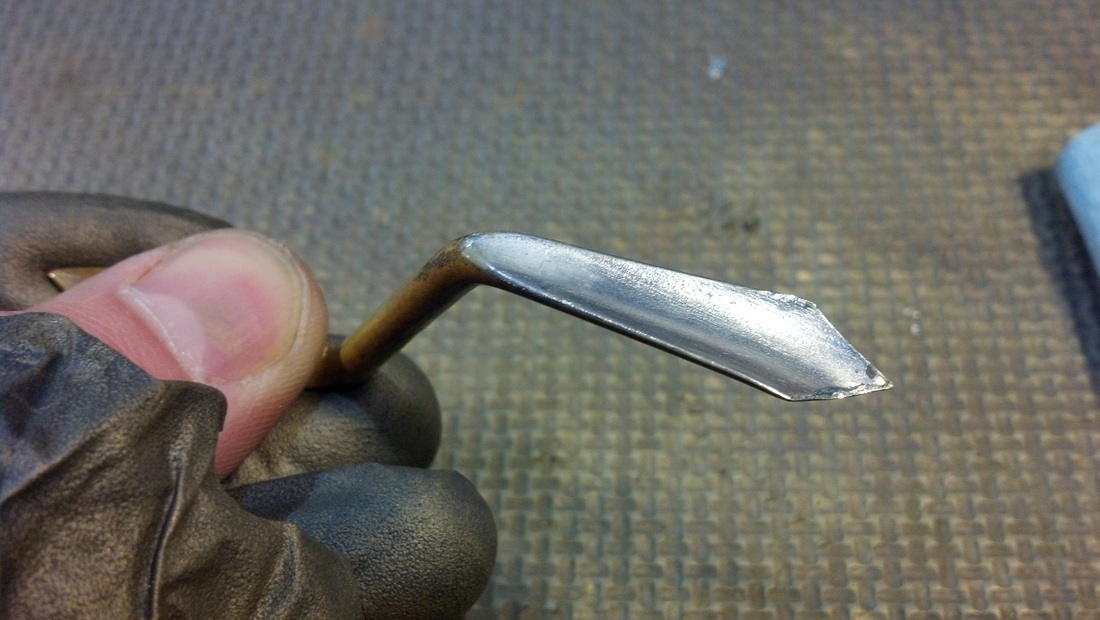 18) Notice the far right side of the brace is shaped to fit around the bell crook. Now we must remove the original solder. 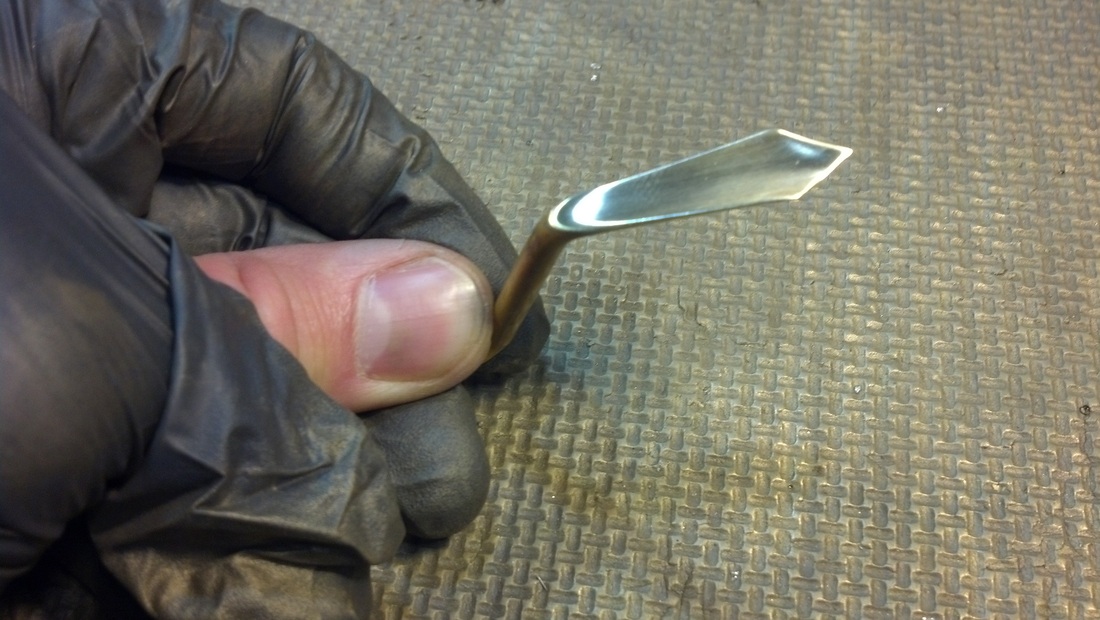 19) I removed the solder with a soft grinding wheel. You may use 400 grit sand paper to do this in a few minutes. Leaving the original solder will cause major issues in most cases so take time now to do this step with care.  20) Flux all mating surfaces of the brace. 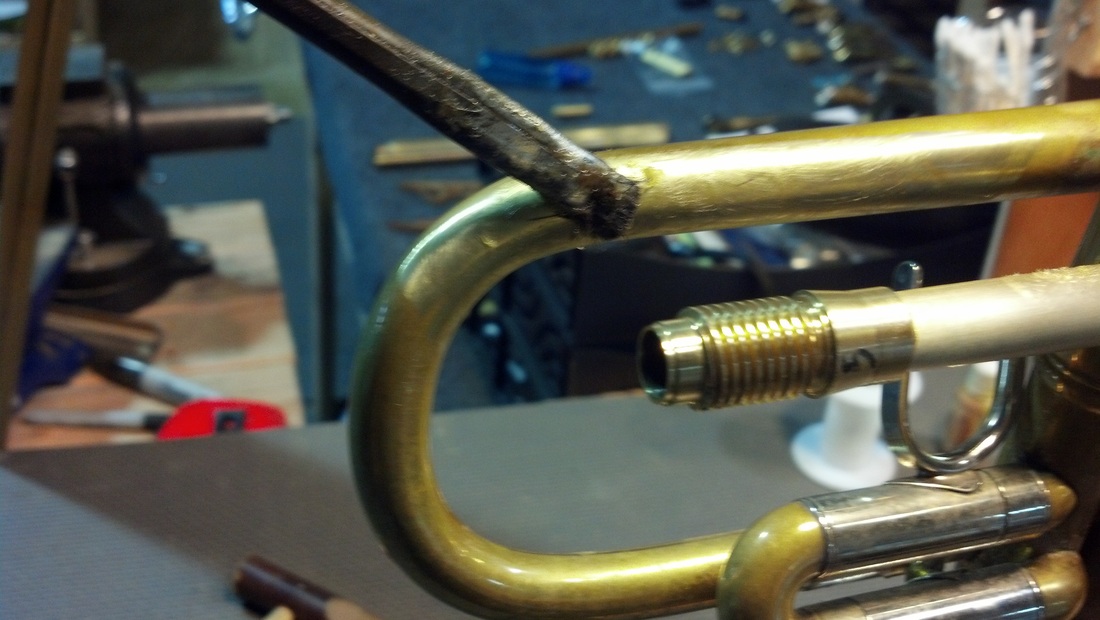 21) Remove all remaining solder from the original brace installation with 400 grit shop roll. Scrap thick layers of solder with a sharp brass scraper if necessary. Do not scrape with materials harder than brass such as steel. Flux all mating surfaces of the leadpipe and bell. 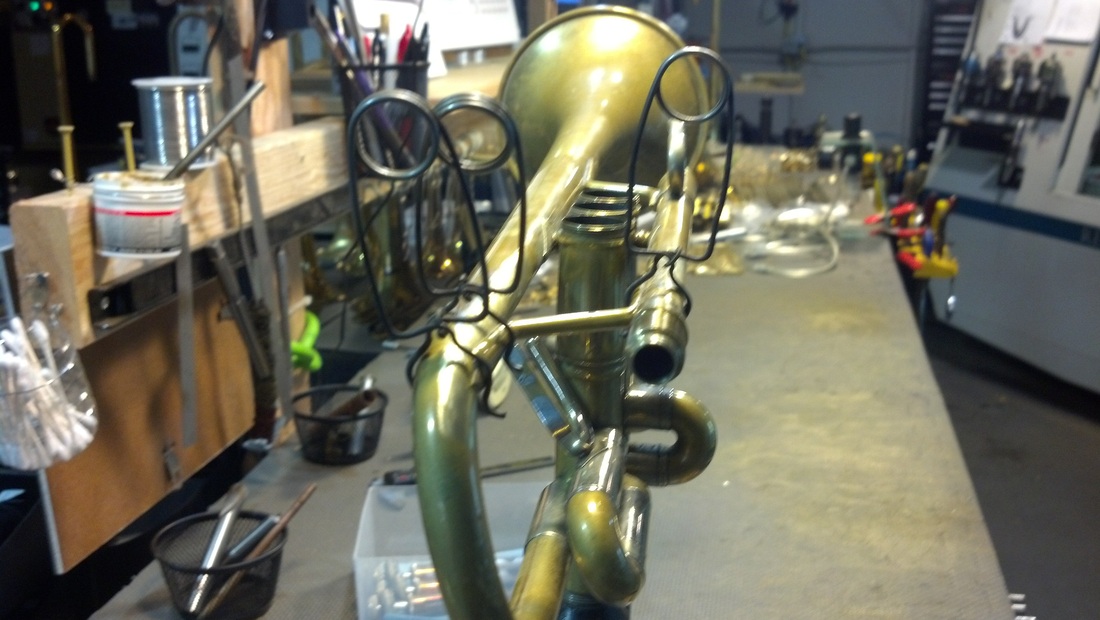 22) Clamp the brace in place after carefully positioning it as far back as possible. I leave around 1/8" of space between the Mount and brace for easier clean up later. 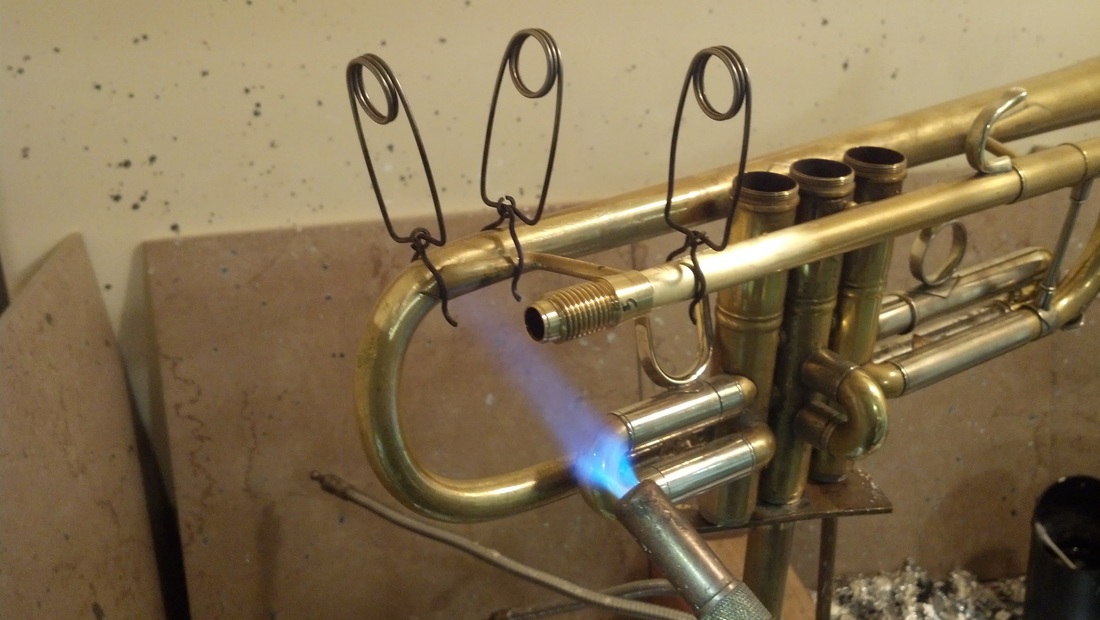 23) I recommend using 60/40 or 70/30 solder for this installation. Always heat from below the joint to be soldered. Take time to heat all parts evenly and only add solder after you see a small plume of smoke, which is a sign that the parts have reached the proper temperature. Do not overheat or you will need to start over from the beginning!  24) Gently tap solder directly at the joints. Feed a bit, look carefully, re-heat lightly and repeat until your joints are completely soldered. Dab a tiny bit of solder where the Mount and leadpipe meet. Use extra flux with a brush if the solder is not sticking immediately. See my videos for more tips.  25) While the assembly is still hot, wipe excess solder from joints with a cotton swab or cotton cloth. Carefully swab the inside of the leadpipe/Mount clean. Be careful not to burn yourself. 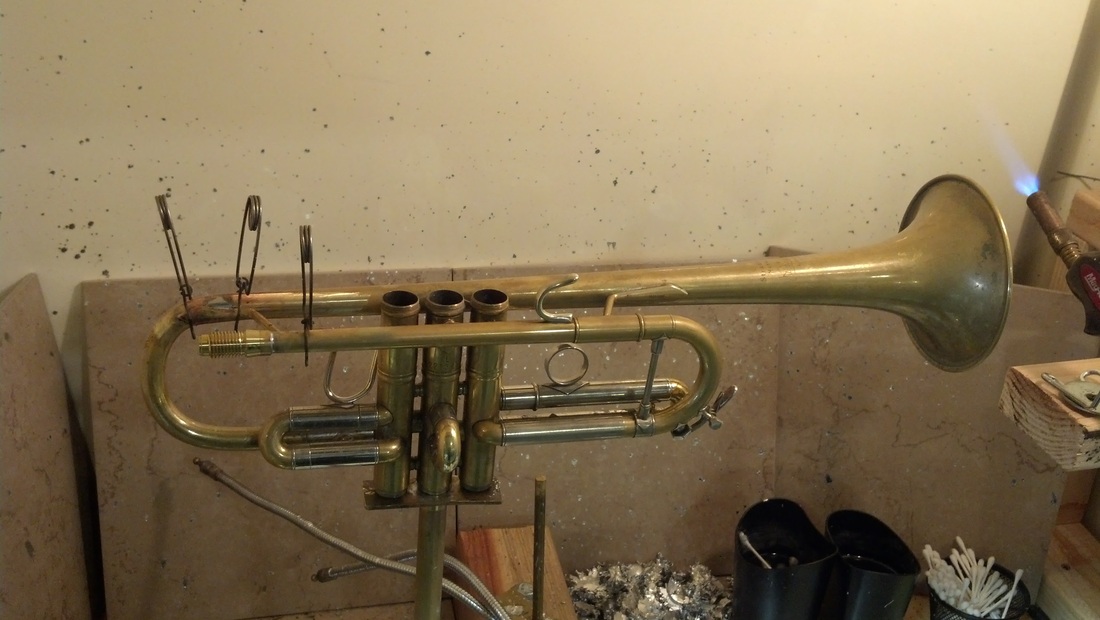 26) Let the horn cool for five or more minutes before handling. I know you're excited at this stage, but cooling artificially with water or a wet rag will weaken or even break the solder joints. Snap a photo and post it to Facebook to pass the time. 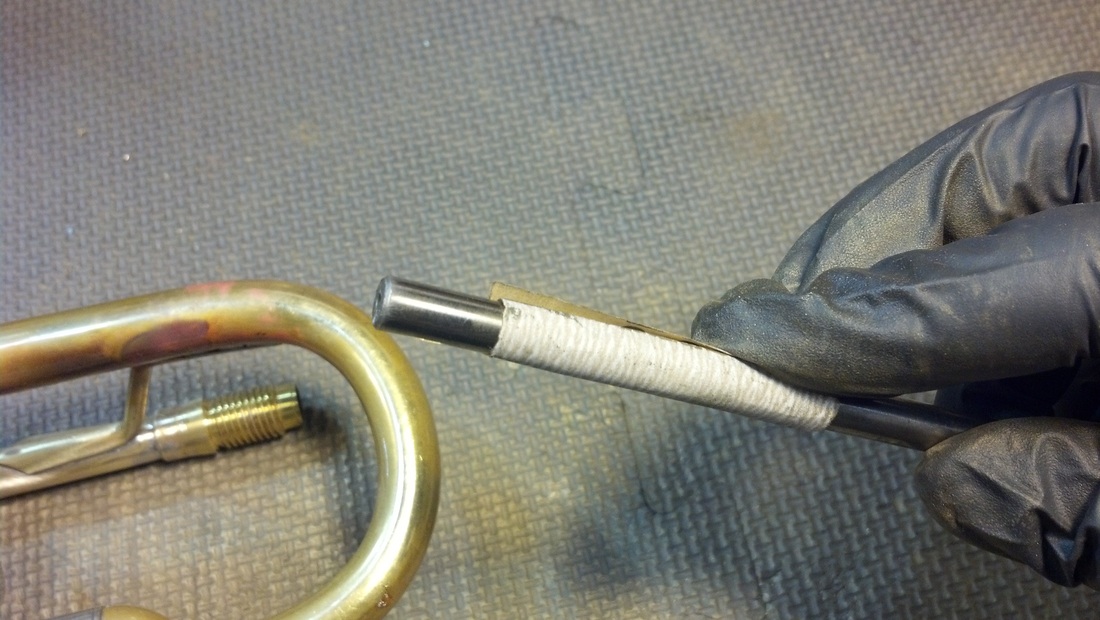 27) Use the shank of a drill bit or a wooden dowel and some 400 grit sand paper to clean out the inside of the Mount and leadpipe.  28) Lightly sand the inside until you have a perfectly clean smooth surface. Don't worry about opening up the venturi a few thousandths on this step, the AGR will correct for this which is why you are installing it today! 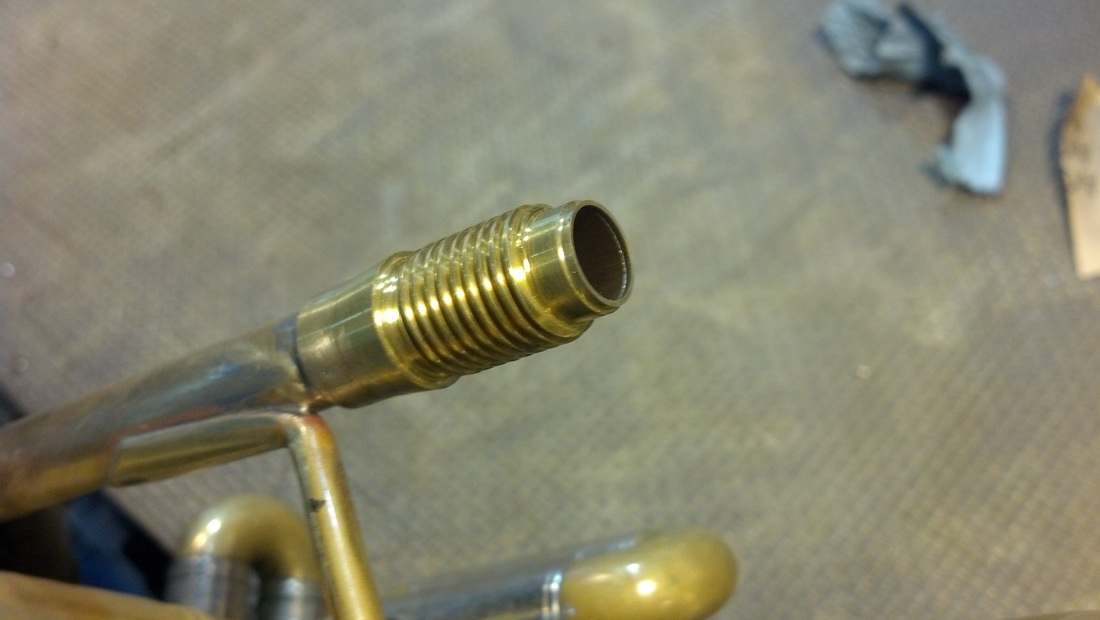 29) Nice clean smooth surface inside the Mount and leadpipe.  30) Now for the cleanup, use 400 grit sand paper to clean up all rough spots and to smooth the transition from the Mount to the Receiver. When I sand new trumpets in the Harrelson Shop, I am careful to sand so that you cannot find the seam between the two until you unscrew the Receiver. This looks very professional and will surprise your friends! 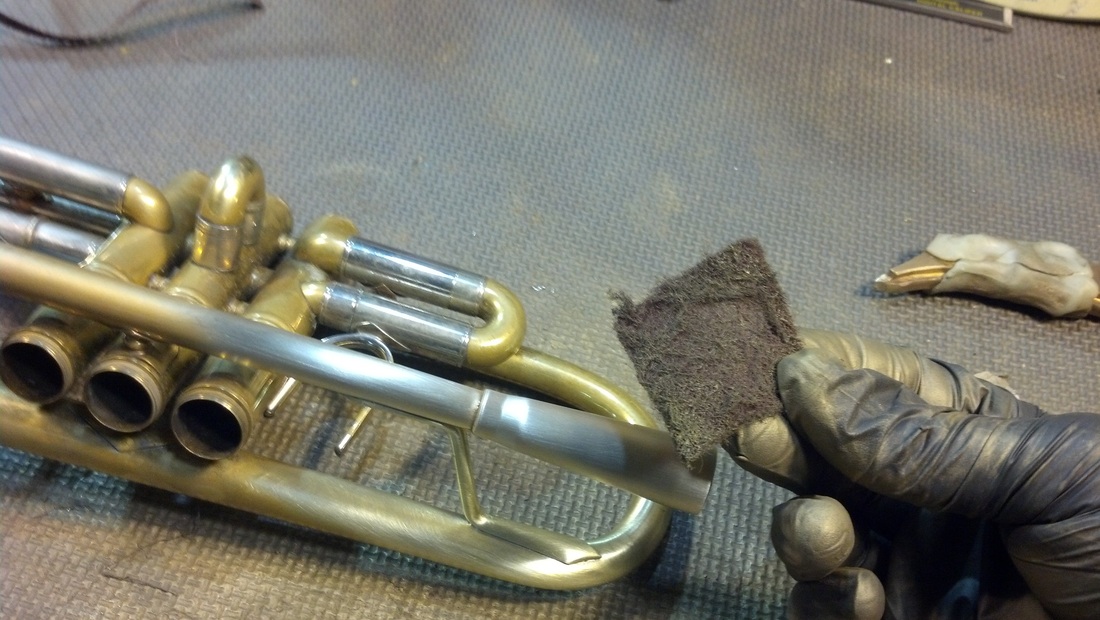 31) I didn't show the scraping step as I only have two hands, but I make all of my own scrapers from scrap brass sharpened on a disc sander. You can see one of my homemade scrapers at the top right of this photo. I carefully scraped off all solder from the joints before final finishing with this small maroon 3M Scotchbrite pad.  32) Notice the details and take your time finishing. I have been doing this kind of work for twenty years so don't expect this to be easy. A good job will look amazing, but it will also take time. 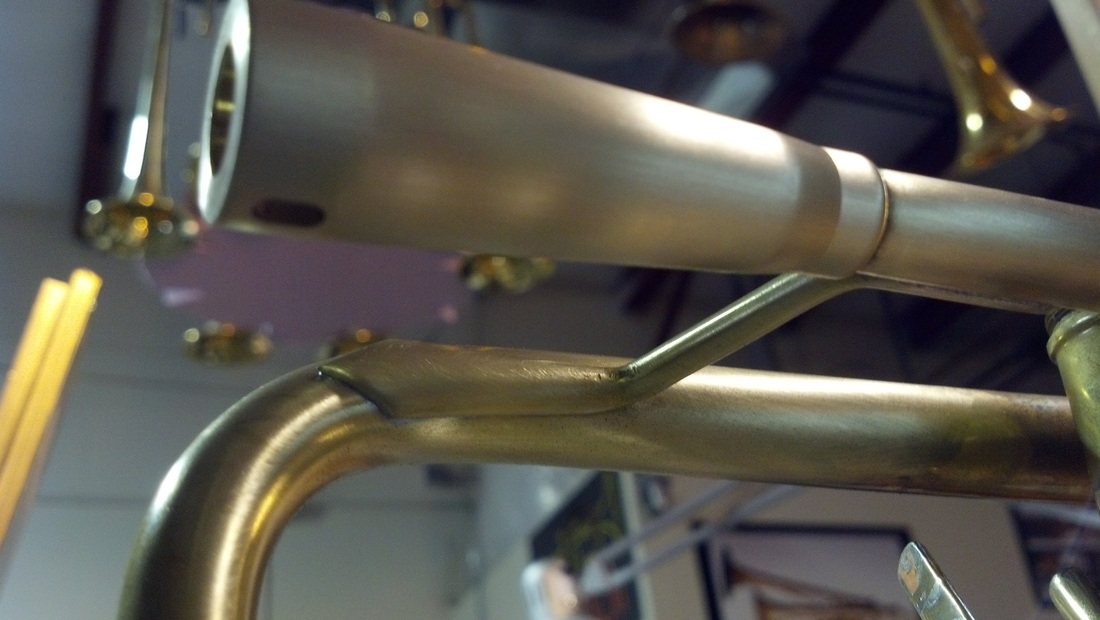 33) Carefully inspect and touch up any remaining solder or rough areas. Notice how the brace slightly wraps around the bell crook on the far left? 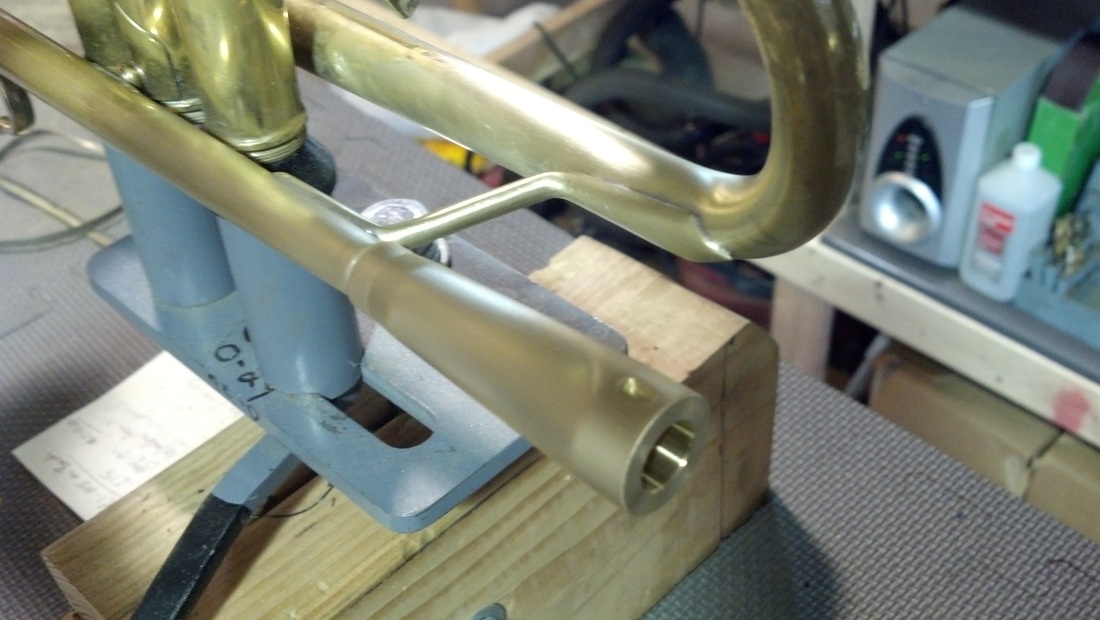 34) Inspect the bottom even though you may be the only one who ever sees this area.  35) Now unscrew the Receiver a bit to take pride in a job well done. 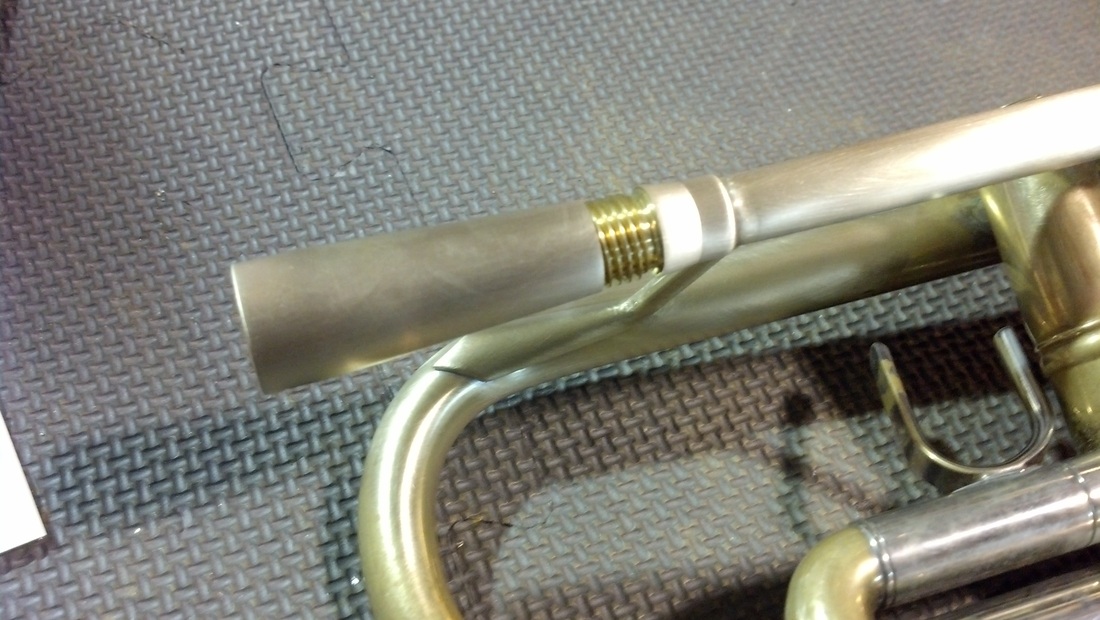 36) Looking good...  37) Prepare the horn for re-assembly by blowing off everything with compressed air. Use safety glasses! Now swab out the valve casings and wipe down the pistons before installation. One small piece of sand from your sand paper or 3M pad could seize your valves! Take time to swab out the leadpipe and bell as dust can get anywhere there is an opening. 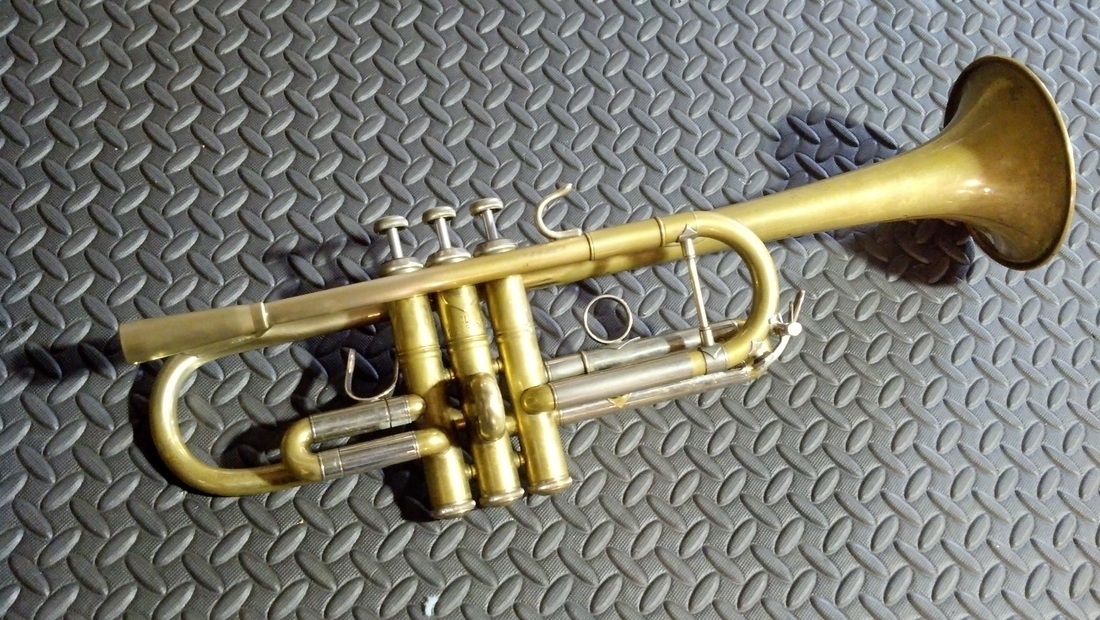 38) Finished AGR Installation on Bach C trumpet. Please share your photos and experiences with your own AGR!  I have developed numerous bell options over the years with the goal of having more than one viable option for every player's preference. Today, most clients typically have 3 to 4 options that will meet their needs. This allows for slight variations in projection, tonal quality and feedback after you've identified the zone of options that fits you specifically.
Choosing a bell is relatively simple and definitely fun. Want more projection? Then a thicker wall is for you. Want to hear sizzle or more sound behind the bell? Then a thin wall will give you more feedback. Just remember that thin wall bells are relatively fragile and less efficient than standard and heavy options. Let's start with versatile bell options. Being a performer of every genre, I tend to prefer a balance of brightness, darkness, projection and feedback behind the horn. I want the best of all worlds. Versatility is often the name of the game and the most popular bell that fits every style of music is bell 1. I modeled this bell after the Bach 37 with a few minor changes. It plays more in tune than a Bach 37 or Yamaha Xeno, yet blends with these factory horns easily. The overtone series is vibrant, rich, colorful and satisfying much like a great Bach trumpet, but without the inconsistencies. Other versatile bell options include bells 9, 7, 3, 4, 6 and 10. That's a lot of options so there's something for everyone. Bells 3 and 6 are more broad and slightly darker than bell 1 offering more low and mid partials in the overtone series. Bells 4 and 10 are even more broad leaning toward a darker tone that is usually suitable for all around playing. Bell 9 is a heavy wall version of Bell 1 designed with a slightly tighter bell tail giving this one more sizzle. And Bell 7 is also similar to Bell 1 designed with a larger bell tail and a larger final diameter of 5.4" producing a vibrant overtone series that projects more evenly to the audience. My personal favorites are bells 7, 8 and 9. Of course, I would like to have one of each, but since I only have three horns, these are my bells. My Summit Midnight has bell 8, which is standard on the Midnight model. My Summit One has bell 7 and the Medusa trumpet has bells 8 and a tighter version of bell 9. For the past several years, I have only had these three trumpets as my personal horns. Maybe when I get ahead on orders I'll build myself a new Summit Two with the new AGR. At least, that's my goal for September. The Bell diameter determines the projection pattern. Standard bells before WWI were often cornet and flugel bells, many of which ranged in size from 4 inches to over 6 inches. With the big band era came a small bell trend in taper, volume displacement and diameter. Most bells in the the 1920's through the 40's had relatively less volume displacement, tighter tapers and a smaller diameter than their predecessors. This was likely due to the nature of big band music, but I can't be sure as I wasn't born until the 70's. A smaller bell diameter projects more directionally, which is nice when you want your music to move forward toward the audience like in a rectangular hall. Likewise, using microphones is typically easier with a smaller bell diameter, but you sacrifice tonal color and an even projection pattern in the process. A larger bell diameter projects more evenly. This is ideal for intimate venues, small audiences, playing softly and being more expressive with your sound. And larger diameter bells work great for larger rooms or even arenas as the sound projects more like the wide setting on an adjustable flashlight. It is unlikely that anyone will get too much light in their eyes with this setting and the same is true musically. A larger diameter bell often results in more listeners sharing positive experiences as they no longer hear the shrillness so common in trumpet projection patterns. Less bell volume in terms of displacement reduces the amplitude of partials in the overtone series. This means that smaller bells have less richness and are usually interpreted as having more edge. This is due to the physical limitation of the smaller space, which results in the full overtone series being diminished. Smaller bell volume is great for players who have lost some of their hearing or for those who prefer a brilliant tone that is easy to hear. I generally do not produce bells with an extremely small volume, but they are produced by other manufacturers. More bell volume in terms of displacement increases the amplitude of partials in the overtone series. Yes, this is the opposite of the last paragraph. Larger bell displacement can be measured in the taper or by filling a bell with water, then pouring it into a measuring cup. The largest bell I produce is the 8, which is probably the largest taper available from any manufacturer. This bell produces every partial in the overtone series and it is obvious the first time you hear a Summit Midnight. The tone is so big, vibrant, rich and full that most people wonder if there are other trumpet players in the room playing along. All of the bells I offer have a fair amount of volume to create more of this affect with bells 1 and 9 being the smallest options. Bell thickness affects projection, feedback, intonation and efficiency. There is a fair amount of physics I could bring into this explanation, but in basic terms a very thin bell will lose energy more easily than a thicker bell. This is due to the anti-nodes setting the bell wall into physical motion. The more your bell vibrates, the more energy you lose and the more problems this will cause. Thin bells are responsible for poor projection, intonation and efficiency. However, a thin bell will give the player a ton of audible feedback behind the horn. Lead players who insist on playing lightweight bells to project are literally fooling themselves. It is physically impossible to project your sound further with a lightweight bell when compared to a standard or heavyweight option of the same taper, material and diameter. So why do so many lead players use thin bells? Usually because the feedback behind the horn sounds better to the trumpet section! Ask the audience and you will always get a different response as thin bells cannot project across a large room. I have had this conversation with many great players and several of them disagree with my findings. The evidence is overwhelming and you can test this yourself with a decibel meter if you're on a budget or a full spectrum analyzer if you have access to the equipment. Simply place your measuring device at the back of the hall and compare horns. Thin wall bells project less amplitude on most or all partials in almost every test. I do offer lightweight bell options, but these are recommended only in situations where they are actually needed. The player who has lost a lot of hearing is the most common scenario followed by the lead player who insists they cannot play an efficient setup. The most efficient lightweight option I offer is bell 10GLT, which is relatively broad and stable. But at the end of the day, a standard weight bell will project further, play more in tune and easier. The major drawback to lightweight bells is that they are damaged easily. Now let's get into the thicker options, bells 5 and 9. Bell 5 is made of pure copper and is the most efficient option I offer. However, it is the least popular bell as most players prefer the extra vibrancy and chaos that is present in the overtone series of a thinner, harder material. Copper is soft and does not set into motion easily meaning it is considerably more efficient than brass. In fact, Aluminum has these same qualities and I will soon be milling bells from solid Aluminum billet for this reason. The drawback to copper is that the tone literally sounds too pure for many players who are accustomed to the sound of a Bach, Schilke, Getzen or Yamaha. Bell 9 is almost the opposite of bell 5. The 9 option is very efficient, vibrant, colorful and it is the thickest brass option I offer. Which bells are best for Orchestral playing? Well, the answer to this question will depend on the type(s) of orchestra(s) and the region of the world you are performing. Many orchestral works call for a broad, dark, open sounding trumpet while others require bright and light. Ideally, an orchestral musician would have many options at his or her disposal and perhaps more so than any other musician. My major was in Trumpet Performance with an emphasis on Orchestra at a small private college known for very high standards in classical music studies. It sounds great to pre-qualify my advice to you by stating I went to a really cool school, but in reality what I have discovered is that you do not need a degree in something to be competent or even great at any skill. And my recommendations are general in this blog entry so your ideas of what will fit your playing best may change after we have had a conversation in person, on the phone or after you have tried a specific bell first-hand. People are subjective and choosing a bell is also subject to the circumstances. Also, all bell recommendations are the same for Bb and C trumpets. With all that said, here are my recommendations for bells listed by composition;
On to Jazz, Lead, Commercial, R&B, New Orleans Traditional Jazz and more. I've played my fair share of gigs in every genre so I do have my specific preferences for various settings. But to give you a general idea of what most of my professional clients choose, here's a list of options listed by genre;
A note on "X" bells, these are turned on the same mandrels as their counterparts with an extra wide diameter, usually 5.3" or larger. The X bells spread your sound out more evenly to your audience for a more consistent and enjoyable listener experience. My life and business is much like a balancing act. Most of the factors determining true balance are completely out of my control as I design and build custom trumpets to your specifications. My clients are essentially in control of how much I work, the level of difficulty and even when I perform the wide variety of steps necessary to complete a custom trumpet. This is probably the opposite of what many perceive. I work alone so there are few witnesses to my daily, weekly and monthly accomplishments. But with every success, I have often overcome some moderate to difficult challenges. This is true of every trumpet order. Despite having some very high end software, machinery and years of experience, every single order is challenging with more steps than you may first imagine are possible. I am devoting another entry to the topic of patience simply due to the fact that a few of my past clients have been incredibly selfish and inconsiderate. There are people in this world who have the attitude that their needs supersede all of my other clients. The, "I want everything and I want it now" approach to dealing with custom makers (of anything) is lacking in humility, respect and dignity. Yes, I am here working for each and every client, but I am in no way encouraged to put my heart into a project when there are a multitude of unique specifications combined with short and hard deadlines based on perceived need. For some people, I believe patience is probably the missing element standing between potential happiness and their unmet needs. I did not learn to build trumpets in a day just like I didn't learn to play trumpet quickly. I have devoted in excess of 70,000 hours to the subject of trumpet design, manufacture and performance. This is more than working a full time job for 30 years. Drawing on my experience as an engineer, fabricator, machinist, performer, educator and businessman, I can tell you one thing for sure. If you ask me to do something that has never been done, I cannot tell you how much time is required to complete the task. There is no way to determine the future when the variables are unknown. I work on the timeline established by reality and this cannot be changed based on perceived needs of upcoming events. If your birthday is in five months and you want to order a custom art trumpet featuring all of your favorite musicians' names with engraving throughout, a new finger ring profile you sketched on a napkin and unique hand carved trim parts, then I'm happy to work with you to make this a reality. But you will likely receive your trumpet one year later than expected. There really is nothing I can do to change this fact as there is only one of me making trumpets for over two hundred clients each year. The process of designing and building completely new components may sound easy. But in reality, a full art trumpet usually requires several weeks of design and machining work, which is done in short shifts between other trumpet builds. This is due to the fact that my vision of computer screens is quite limited. I was born with one carotid artery feeding blood to my brain rather than the normal two arteries. My visual cortex is literally starved of oxygen and nutrients on a regular basis limiting my intake of images and motion. This is also why I prefer to play below double high C as the internal psi produced when playing high notes does limit the blood supply to my brain even further! In contrast, if you really want a new custom trumpet in five months you could order a Summit complete with your choice of leadpipe, bell, tuning slide, AGR, your name milled into the bracing, trim kit style and weight, finger ring style and positioning, water keys, finger button inlays and finish. There are a lot of options available to those wishing to be on the shorter end of delivery dates and in the grand scheme of things, five months is relatively fast. The realities of producing what you have in your mind coupled with my skills and capacity will result in a truly rewarding experience, if you only give me time. Ordering the latest design after seeing the first prototype is a lot of fun, but keep in mind that anything new will require a great deal of work on the back end. It is not uncommon for a new design to go into production 1 to 2 years after the prototyping process has begun. If this seems like a lot of time, then consider that I do in fact make everything myself. If you're in a hurry to get a new custom trumpet, I sincerely suggest you consider the following;
In contrast, the following will definitely require more time;
I enjoy designing and building beautiful instruments while sharing vision with each of my clients. I love working with trumpet players from all walks of life and I consider myself to be very fortunate. Together, we can create your trumpet designed with every detail you have imagined. Your trumpet could potentially last many lifetimes, so please give me 5 to 18 months to make it a reality.
|
 Jason Harrelson
Inventor, Musician, Educator and Founder of Harrelson Trumpets, Trumpet Momentum and Harrelson Momentum. Archives
July 2024
|

 RSS Feed