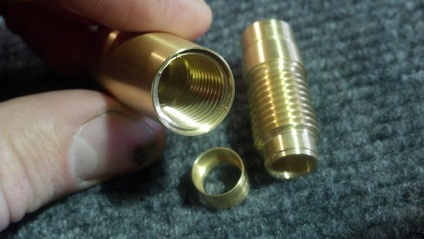
 As mentioned in part I of this blog topic, the Adjustable Gap Receiver combines three simple concepts into one new component of the brass instrument. These are Efficiency, Regulated Air Flow and Consistent Impedance. Let's explore each of these concepts individually to better understand the advantages gained by fine tuning your trumpet setup. Efficiency is really the backbone of my research and development over the past twenty years. The AGR is considerably more efficient than any standard receiver thanks to the design of all three components; the mount, insert and receiver. Energy is lost in the standing wave of a brass instrument much like electricity is lost in low gauge, poorly insulated wiring. A thin mouthpiece receiver and mount will easily vibrate when an anti-node (high pressure area) is located at the mouthpiece receiver. Considering the receiver is near the end of the instrument, there is almost always an anti-node at this location converting your sound wave into motion. This essentially robs energy from your sound introducing instability on various partials of the overtone series. The AGR is available in various shapes and sizes allowing you to fine tune efficiency. Looking for the most efficient setup possible? The 3/4" cylindrical version (R2) the most energy efficient option meaning your wide interval leaps will lock in solid at any dynamic level. Want more physical feedback in the form of vibration in the leadpipe? Even though the 5/8" taper version (R4) is the least efficient, it offers more feedback especially when playing in loud environments. My personal favorite is the 3/4" tapered version (R1) which is included with every new Summit trumpet built since September of this year. I have owned and tested all of the various receiver systems produced in the last 100+ years, so far as I know. This includes three notable versions that attempted to address gap adjustment. The Courtois receiver was a step in the right direction with a set screw to lock in the distance from the leadpipe to the mouthpiece. However it was clunky and would get stuck all of the time. The second version was produced by a great trumpet builder and was used on at least two different brands, but wasn't much different from the Courtois iteration. The third was made by Adams, which is a percussion company that decided to start producing trumpets. Their version looks really nice and has a smooth feel to the geared wing nut. Again, this is another step in the right direction. But all three are missing my first requirement, Efficiency! Not to mention none of them offered a simple way of knowing the best gap setting with multiple mouthpieces, or even one mouthpiece. On the Adams, it is very easy to set the gap, yet just as easy to move it out of place and wonder why slotting and flexibility feels out of balance. On the other two, setting the gap is more difficult and changing to a different mouthpiece required a lot of adjusting all over again. My hat is off to all three manufacturers for moving in the right direction. These companies are innovators in the true sense of the word and their efforts inspired me to create the AGR Retrofit Kit. The AGR Retrofit Kit will allow anyone to experience the benefits of improved efficiency while fine tuning mouthpiece gap resistance AND impedance AND venturi air flow. If there were something more I could fine tune within this component, I would have designed it to do that too. Back to how efficiency was designed into the AGR, I designed the mount to be soldered directly to the leadpipe with almost no clearance space. This was intended to prevent air pockets when installed, which I have discovered on new and vintage horns literally hundreds of times. An air pocket or unsoldered area of a receiver mount directly causes energy loss in the standing wave. Almost every Bach Stradivarius I have ever disassembled has had this problem. When installing the AGR Mount, you must lightly sand down the outside diameter of the leadpipe end until it fits perfectly. Assuming you flux everything and solder properly, this will completely prevent air pockets within the joint. There's more, the AGR Mount was designed to be relatively thick and the threads are a very special shape that maximizes surface area contact with the Receiver when screwed together. In fact, the surface area of this thread design is around five times greater than is produced with a standard 60 degree thread tool. This ensures the AGR does not set into motion regardless of the amplitude of the anti-node directly beneath. I cannot recall the last time I cracked a wide interval slur in a performance and this design only reinforces my integrity as a player. Yep, there's even more to how I integrated efficiency into the AGR. The key to fine tuning the venturi, impedance and gap is the Insert that is held in place precisely between the Mount and the Receiver. I'll include some drawings in the next entry to illustrate this design. But the wall thickness of the inserts is a crucial piece of the efficiency puzzle and I designed these right. Sure it has taken me half of my life to finally finish what I started on this component, but taking my time to do it right has really paid off, for myself and hopefully for you. My next entry will explore Impedance and Mouthpiece Gap, which are in a sense the same thing...
0 Comments
Your comment will be posted after it is approved.
Leave a Reply. |
Jason Harrelson
Inventor, Musician, Educator and Founder of Harrelson Trumpets, Trumpet Momentum and Harrelson Momentum. Archives
July 2024
|


 RSS Feed
